Please send your Questions & Answers or Feedback to "dvmadhavreddy@javabook.org"

Please send your Questions & Answers or Feedback to "mohan@javabook.org"

Memory Tuning


Memory tuning is one of the important aspect for a DBA. If the memory is undersized or oversized it degrades the application performance. If the memory is undersized, it degrades the performance because of excessive hard parsing or more number of I/O's. If we have sufficient amount of memory, allocate 35% to 45% of memory for SGA. If we dont have sufficient amount of memory, allocate atleast 25% to 30% of memory for SGA.

Prior to 9i, its a tough task for a DBA to allocate memory for various sub components and to increase the values of sub components parameters.
Prior to 9i, all sub components parameters are static in nature.
In version 9i, oracle has introduced dynamic parameters for various sub components.
In version 9i, dynamically we can shrink and expand depending on the work load but DBA intervention is required.
In version 9i, oracle has introduced pga_aggrigate_target to allocate a consolodated PGA memory for sorting operations.
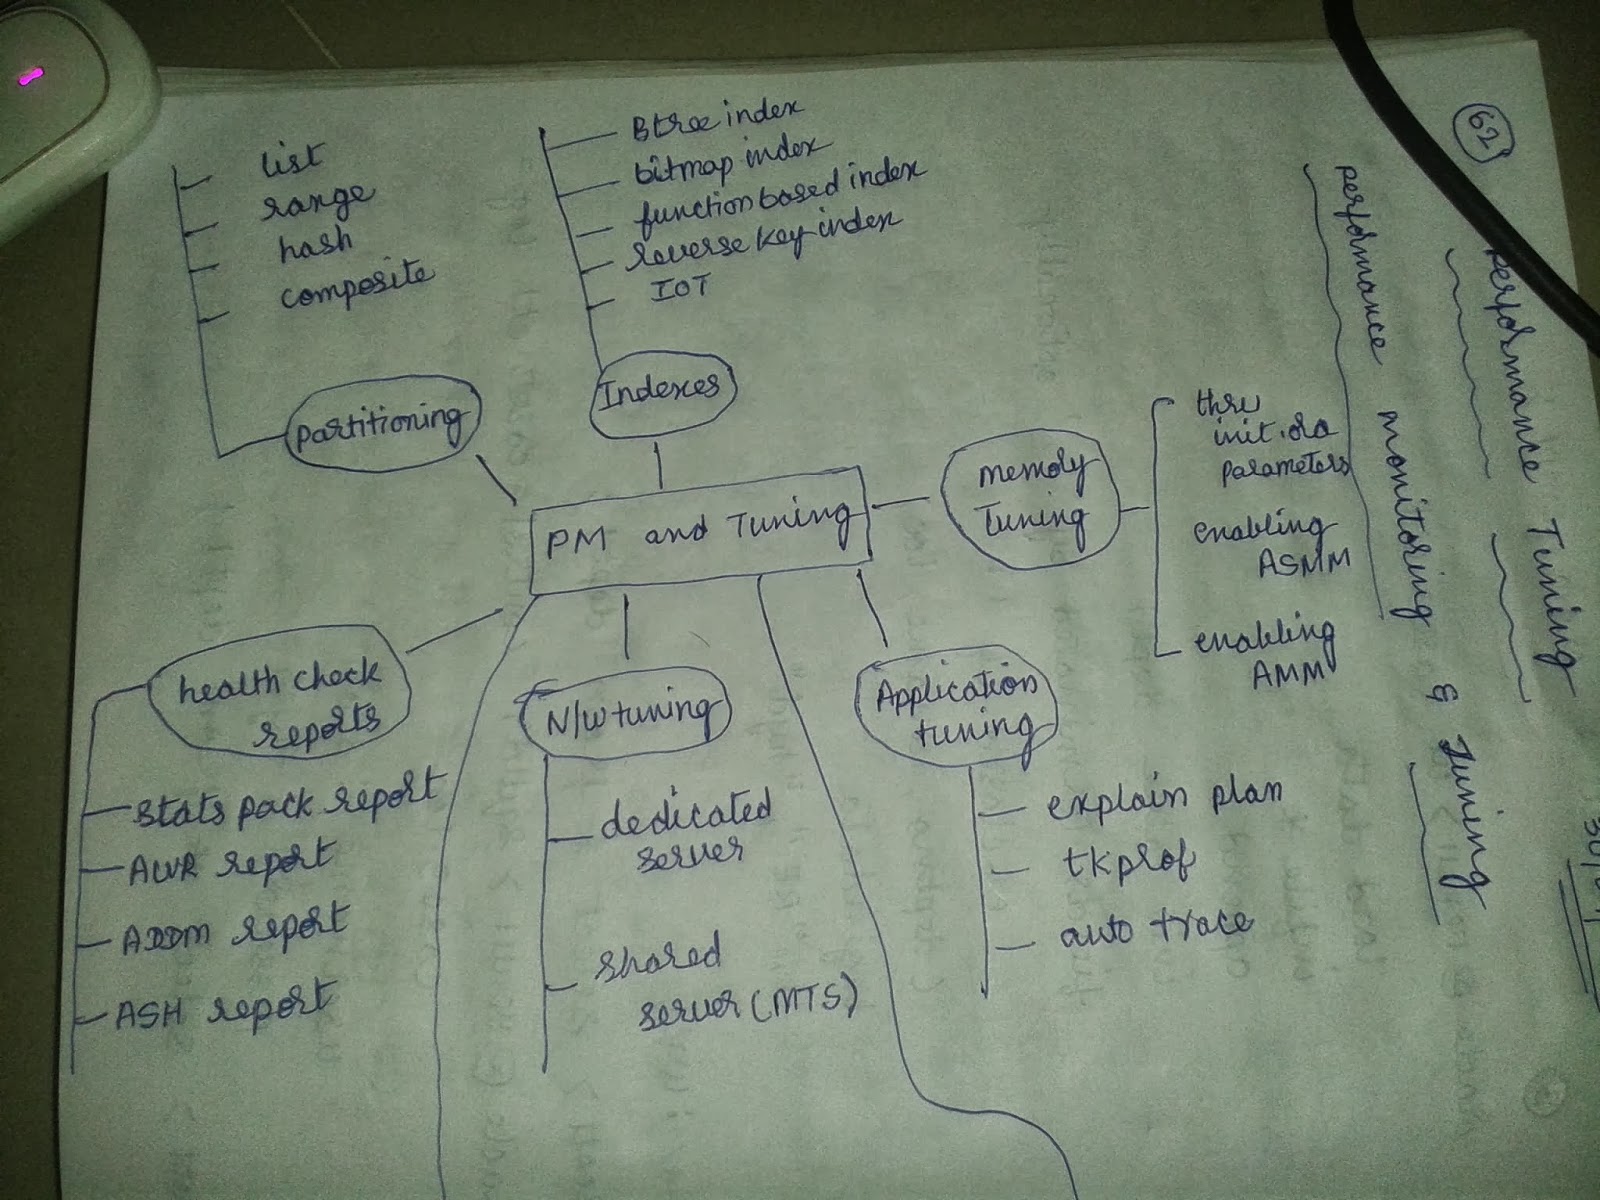
In version 10g, oralce has introduced automatic shared memory management(ASMM) by introducing a new background process and a new parameter(MMAN,sga_target).
In order to enable ASMM, we need to set sga_target to a non zero value. Once we enable ASMM, oracle dynamically shrinks and expands the sizes of the sub components depending on the work load. Once we enable ASMM, the following parameters are considered as auto tunable
1.db_cache_size
2.shared_pool_size
3.large_pool_size
4.java_pool_size
5.streams_pool_size
The following parameters are not considered as auto tunable
1.log_buffers
2.db_nk_cache_size
3.db_recycle_cache_size
4.db_keep_cache_size

sga_max_size represents the maximum allowable size for SGA.
sga_target value cannot go beyond sga_max_size.

After enabling ASMM, even if we set dynamic parameters to a value, oracle considers the parameters value as a lower limit and it expands further if there is a requirement.
In 11g, oracle has introduced automatic memory management by introducing the parameters
memory_max_target
memory_target
memory_target cannot exceed memory_max_target value.
In 11g, by default oracle allocates 60% of memory_target to SGA and 40% to PGA.

If we want to disable AMM, set memory_target to zero.
memory_target and sga_target are dynamic parameters.
Ideally, the hit rates of all sub components should be greater than or equal to 90%.
We can get hit rates by writing some queries or by generating stats pack report or AWR report(Automatic Workload Repository).

Performance Monitoring and Tuning


Tuning starts at design phase. If the design is not proper, it leads to redundancy, updation problems and deletion problems. During design phase, database architect will follow a technique calles Normalization.
Normalization is nothing but spliting a huge table into multiple smaller independant segments. Various normal forms are 1NF, 2NF, 3NF, BCNF, 4NF etc. As the degree of NF increases, we get n number of tables.
If n number of tables are involved, we get n-1 joining conditions. As the no of joining conditions are more, it degrades the performance.
In the design phase, database architect will use some third party data modeling tools like ERWIN to create a logical model(ER Diagrams). Once the logical model is ready, it will be converted into physical model(actual tables).
In data modeling terminology, the process of converting logical model into physical model is called forward engineering.
The process of converting physical model into logical model is called reverse engineering.
De Normalization is a technique generally we follow in OLAP systems to minimize the no of tables in the select statement.

Data Guard

oracle@venu1> export ORACLE_SID=venu
oracle@venu1> sqlplus / as sysdba
SQL> startup
SQL> select name.open_mode,log_mode,force_logging from v$database;
SQL> alter database force logging;
SQL> show parameter spfile;
SQL> create pfile from spfile;
SQL> shut immediate
SQL> exit
oracle@venu1> cd $ORACLE_HOME/dbs
oracle@venu1 dbs> mv spfilehrms.ora spfilehrms.ora.bkp
oracle@venu1 dbs> cd
oracle@venu1> export ORACLE_SID=hrms
oracle@venu1> sqlplus / as sysdba
SQL> startup
SQL> show parameter spfile
SQL> select name from v$datafile;
SQL> select name from v$controlfile;
SQL> select member from v$logfile;
SQL> archive log list
SQL> shut immediate
SQL> exit
Always sender is tnsnames.ora
"db_unique_name" is primary
"DB_UNIQUE_NAME" is standby
oracle@venu1> cd $ORACLE_HOME/dbs
oracle@venu1 dbs> vi initvenu.ora
############data guard parameter for primary role initialization parameters############
log_archive_dest_1='LOCATION=USE_DB_RECOVERY_FILE_DEST VALID_FOR=(ALL_LOGFILES,ALL_ROLES)'
log_archive_dest_2='SERVICE=to_venu_stdby DB_UNIQUE_NAME=venu_stdby'
log_archive_config='DG_CONFIG=(venu,venu_stdby)'
db_unique_name=venu
log_archive_dest_state_1=enable
log_archive_dest_state_2=enable
###########standby role initialization parameters####################
fal_server=to_venu_stdby
standby_file_management=auto

if manual, it creates the structural objects with different name and in different location i.e. in dbs directory.

#################configure the listener at primary side#######################
oracle@venu1> cd $ORACLE_HOME/network/admin
oracle@venu1 admin> vi listener.ora
LISTENER =
(DESCRIPTION_LIST =
(DESCRIPTION =
(ADDRESS = (PROTOCOL = TCP)(HOST = venu1.oracle.com)(PORT = 7777))
#(ADDRESS = (PROTOCOL = IPC)(KEY = EXTPROC1521))
)
)
SID_LIST_LISTENER =
(SID_LIST =
(SID_DESC =
(SID_NAME=venu)
(ORACLE_HOME=/u01/app/oracle/product/11.2.0/db_home)
)
)
ADR_BASE_LISTENER = /u01/app/oracle

oracle@venu1 admin> cd
oracle@venu1>
################configuring tnsnames.ora at primary side################
oracle@venu1> cd $ORACLE_HOME/network/admin
oracle@venu1 admin> vi tnsnames.ora
#####FOR LOCAL
TO_VENU =
(DESCRIPTION =
(ADDRESS_LIST =
(ADDRESS = (PROTOCOL = TCP) (HOST = venu1.oracle.com) (PORT=7777))
)
(CONNECT_DATA =
(SERVICE_NAME = venu)
)
)

######FOR SWITCH OVER
TO_VENU_STDBY =
(DESCRIPTION =
(ADDRESS_LIST =
(ADDRESS = (PROTOCOL = TCP) (HOST = venu2.oracle.com) (PORT=7777))
)
(CONNECT_DATA =
(SERVICE_NAME = venu_stdby)
)
)
oracle@venu1 admin> cd
oracle@venu1>
root@venu1> su - oracle
oracle@venu1>  cd $ORACLE_HOME/dbs
oracle@venu1 dbs> scp initvenu.ora venu2:/home/oracle/
oracle@venu2's password :
oracle@venu1 dbs>

############standby side###############
root@venu1> ssh venu2
root@venu2> su - oracle
oracle@venu2> cp initvenu.ora initvenu_stdby.ora
oracle@venu2> mv initvenu_stdby.ora $ORACLE_HOME/dbs
oracle@venu2> cd $ORACLE_HOME/dbs
oracle@venu2 dbs> vi initvenu_stdby.ora
##########dataguard parameters for primary role##################
log_archive_dest_1='LOCATION=USE_DB_RECOVERY_FILE_DEST VALID FOR=(ALL_LOGFILES,ALL_ROLES)'
log_archive_dest_2='SERVICE=to_venu DB_UNIQUE_NAME=venu'
log_archive_config='DG_CONFIG=(venu,venu_stdby)'
db_unique_name=venu_stdby
log_archive_dest_state_1=enable
log_archive_dest_state_2=enable
##########standby role initialzation parameters#############
fal_server=to_venu
standby_file_management=auto
db_file_name_convert=('/u02/app/oracle/venu','/u03/app/oracle/venu/')
log_file_name_convert=('/u02/app/oracle/venu','/u03/app/oracle/venu/')

oracle@venu2 dbs> cd
oracle@venu2>
root@venu2> mkdir -p /u03/app/oracle
root@venu2> mkdir -p /u03/app/oracle/venu
root@venu2> mkdir -p /u03/app/oracle/fast_recovery_area
root@venu2> mkdir -p /u03/app/oracle/fast_recovery_area/venu

root@venu2> chown -R oracle:oinstall /u03/app/oracle
root@venu2> chown -R oracle:oinstall /u03/app/oracle/venu
root@venu2> chown -R oracle:oinstall /u03/app/oracle/fast_recovery_area
root@venu2> chown -R oracle:oinstall /u03/app/oracle/fast_recovery_area/venu

root@venu2> chmod -R 775 /u03/app/oracle
root@venu2> chmod -R 775 /u03/app/oracle/venu
root@venu2> chmod -R 775 /u03/app/oracle/fast_recovery_area
root@venu2> chmod -775 /u03/app/oracle/fast_recovery_area/venu

root@venu2> su - oracle
oracle@venu2> cd /u03/app/oracle/venu/
oracle@venu2 venu> mkdir adump
oracle@venu2 venu>

##################configuring listener and tnsnames########################
oracle@venu2> netca
oracle@venu2> cd $ORACLE_HOME/network/admin
oracle@venu2 admin> vi listener.ora

LISTENER1 =
(DESCRIPTION_LIST =
(DESCRIPTION =
(ADDRESS = (PROTOCOL = TCP)(HOST = venu2.oracle.com)(PORT = 7777))
#(ADDRESS = (PROTOCOL = IPC)(KEY = EXTPROC1521))
)
)
SID_LIST_LISTENER1 =
(SID_LIST =
(SID_DESC =
(SID_NAME=venu_stdby)
(ORACLE_HOME=/u01/app/oracle/product/11.2.0/db_home)
)
)
ADR_BASE_LISTENER1 = /u01/app/oracle


oracle@venu2> cd $ORACLE_HOME/network/admin
oracle@venu2 admin> vi tnsnames.ora

TO_VENU_STDBY =
(DESCRIPTION =
(ADDRESS_LIST =
(ADDRESS = (PROTOCOL = TCP) (HOST = venu2.oracle.com) (PORT=7777))
)
(CONNECT_DATA =
(SERVICE_NAME = venu_stdby)
)
)


TO_VENU =
(DESCRIPTION =
(ADDRESS_LIST =
(ADDRESS = (PROTOCOL = TCP) (HOST = venu1.oracle.com) (PORT=7777))
)
(CONNECT_DATA =
(SERVICE_NAME = venu)
)
)

oracle@venu2 admin> cd
oracle@venu2>
########configure password file both primary and standby############
oracle@venu2 dbs> orapwd file=orapwvenu_stdby password=rac entries=3 force=y
oracle@venu1 dbs> orapwd file=orapwvenu password=rac entries=3 force=y

#########start the primary database#############
oracle@venu1> export ORACLE_SID=venu
oracle@venu1> sqlplus / as sysdba
SYS> startup
#########start the standby database###########
oracle@venu2> export ORACLE_SID=venu_stdby
oracle@venu2> sqlplus / as sysdba
SYS> startup nomount
SYS> select instance_name,status from v$instance;

oracle@venu1> export ORACLE_SID=venu
oracle@venu1> rman target sys/rac auxiliary sys/rac@to_venu_stdby
RMAN>duplicate target database for standby for active datbase;
###open standby alert log#########

@@@@SNAPSHOT STANDBY@@@@@
SYS>select open_mode,name,database_role,protection_mode,flashback_on from v$database;
SYS>alter database recover managed standby database cancel;
SYS>select open_mode,name,database_role,protection_mode,flashback_on from v$database;
SYS>alter database convert to snapshot standby;
SYS>select open_mode,name,database_role,protection_mode,flashback_on from v$database;
SYS>select name,open_mode from v$database;
SYS>alter database open;
SYS>select open_mode,name,database_role,protection_mode,flashback_on from v$database;
SYS>create user u1 identified by u1;
SYS>grant connect,resource to u1;
SYS>conn u1/u1;
u1>create table a(a number);
u1>insert into a values(1);
u1>commit;
u1>conn / as sysdba
SYS>select * from all_users;
SYS>shut immediate
SYS>startup mount
SYS>select open_mode,name,database_role,protection_mode,flashback_on from v$database;
SYS>alter database convert to physical standby;
SYS>shut immediate
SYS>startup mount
SYS>select open_mode,name,database_role,protection_mode,flashback_on from v$database;
SYS>archive log list
SYS>alter database open;
SYS>conn u1/u1

@@@switchover@@@
venu1>alter database commit to switchover to physical standby;
venu1>shut immediate
venu2>alter database commit to switchover to primary standby;
venu2>shut immediate
venu2>startup
venu1>export ORACLE_SID=venu
venu1>sqlplus / as sysdba
venu1>startup mount
venu1>select open_mode,name,database_role,protection_mode,flashback_on from v$database;

@@@maximum protection to maximum availability@@@
venu1>shut immediate
venu1>startup mount
venu1>alter database set standby database to maximise availability;
venu1>alter database open;
venu1>select open_mode,name,database_role,protection_mode,flashback_on,controlfile_type from v$database;

@@@maximum  availability to maximum performance@@@
venu1>shut immediate
venu1>startup mount
venu1>alter database set standby database to maximise performace;
venu1>select open_mode,name,database_role,protection_mode,flashback_on,controlfile_type from v$database;

venu2>select open_mode,name,database_role,protection_mode,flashback_on from v$database;
In 10g, it takes last destination as FRA.
In 11g, it takes first destination as FRA.

SQL Loader

oracle@venu1> export ORACLE_SID=venu
oracle@venu1> sqlplus / as sysdba
SQL> startup

oracle@venu1> vi case1.ctl
load data
infile *
into table dept1
fields terminated by ',' optionally
enclosed by '"'
(deptno,dname,loc)
begindata
10,"research","hyderabad"
20,"mrk","banglore"
:wq!

SQL> conn scott/tiger
scott> select * from tab;
scott> create table dept1 as select * from dept where 1=2;
scott> select * from tab;
scott> select * from dept1;
scott> desc dept1
oracle@venu1> which sqlldr
oracle@venu1> export ORACLE_SID=venu
oracle@venu1> sqlldr control=case1.ctl log=case1.log
username : scott
password : tiger
SQL> select * from dept1;

oracle@venu1> vi case2.ctl
load data
infile 'case2.dat'
insert into table emp1
(empno position(01:04) internal external,
ename position(06:15) char,
job position(19:24) char,
mgr position(26:30) internal external,
sal position(33:39) decimal external,
comm position(41:48) decimal external,
deptno position(51:55) internal external)
:wq!

scott> create table emp1 as select * from emp where 1=2;
scott> select * from emp1;
oracle@venu1> sqlldr control=case2.ctl log=case2.log data=case2.dat
username : scott
password : tiger
scott> select * from emp1;

oracle@venu1> vi case3.ctl
load data
infile *
append
into table dept1
fields terminated by ',' optionally
enclosed by '"'
(deptno,dname,loc)
begindata
11,"re","hyd"
:wq!
scott> select * from dept1;
oracle@venu1> sqlldr control=case3.ctl log=case3.log
username : scott
password : tiger
scott> select * from dept1;

Flashback Database


SQL> select sysdate from dual;
SQL> set time on;
SQL> select * from all_users;
SQL> select username from all_users where username='SCOTT';
SQL> drop user scott cascade;
SQL> select username from all_users where username='SCOTT';
SQL> shut immediate
SQL> startup mount
SQL> flashback database salgrade to timestamp to_timestamp('09-MAY-2013 18:23:45','dd-mm-yyyy hh24:mi:ss');
SQL> alter database open read only;
SQL> conn scott/tiger
scott> conn / as sysdba
SQL> shut immediate
SQL> startup mount
SQL> alter database open resetlogs;

Flash back rows


SQL> select sysdate from dual;
SQL> set time on;
SQL> conn scott/tiger
scott> select * from salgrade;
scott> delete from salgrade where grade=1;
scott> commit;
scott> alter table salgrade enable row movement;
scott> flashback table salgrade to timestamp to_timestamp('09-MAY-2013 18:23:45','dd-mm-yyyy hh24:mi:ss');

Flashback Technology


We need to configure the database in the flashback mode in the mount state in oracle 10g.
In oracle 11g, we can configure the database in flashback mode while the database is in open state.

root@venu1> su - oracle
oracle@venu1> export ORACLE_SID=venu
oracle@venu1> sqlplus / as sysdba
SQL> startup
SQL> select name,open_mode,log_mode,flashback_on from v$database;
SQL> select instance_name,status from v$instance;
SQL> conn scott/tiger
scott> select * from tab;
scott> drop table salgrade;
All DDL commands are auto commit.
scott> show recyclebin
scott> flashback table salgrade to before drop;
scott> select * from tab;
scott> conn / as sysdba
SQL> alter database flashback on;
SQL> select flashback_on from v$database;
oracle@venu1> cd /u01/app/oracle/fast_recovery_area/venu/flashback
oracle@venu1 flashback> ls
SQL> select sysdate from dual;
SQL> set time on;
SQL> conn scott/tiger
scott> select * from tab;
scott> drop table emp purge;
scott> show recyclebin;
scott> conn / as sysdba
SQL>set time off;
SQL> shut immediate;
SQL> startup mount
SQL> flashback database to timestamp to_timestamp('09-MAY-2013 18:12:16','dd-mm-yyyy hh24:mi:ss');
SQL> alter database open read only;
SQL> conn scott/tiger
scott> select * from tab;
scott> conn / as sysdba
SQL> shut immediate
SQL> startup mount
SQL> select open_resetlogs from v$database;
SQL> alter database open;
SQL> alter database open resetlogs;

Archivelogs dig from top to bottom.
Flashback logs dig from bottom to top.

SQL Loader


SQL loader is a utility given by oracle to load the data from flat files into oracle database.


SQL loader can load fixed length, separated by comma, delimited by special charecters etc.
.csv --> comma separated value.

Datafile contains the actual data.
Controlfile has to be created by the DBA.
Controlfile describes how the data is in datafile & into which tables sqlloader has to load.
Log file shows the progress of the loading activity and it also contains error messages.
Discard file contains the records that are discarded.

Flashback data archive/total recall


Flashback data archive(FBDA) is a new concept introduced in 11g version of oracle.
This is mostly used in case of auditing.
FBDA is a new database object created along with the storage and retension policies.

FDA is a new tablespace designated.
Once we configure FDA, FBDA gets enabled and it picks the values from database buffer cache(DBC) updates to the tables that are created in a tablespace that was designated.
Insert is not going to record anything in the flashback archive tables.
In order to create FDA, user should have DBA role or Flashback data archive administrator role.

Recycle Bin


Introduced in 10g version of oracle.
From 10g, once we drop a table, oracle considers or marks that table as dropped but retains the table in the recycle bin.
As such there is no separate memory area allocated for recycle bin.
Whatever the space occupied by the segment, that space will be considered as the space for recycle bin.
Oracle retains the table in the recycle bin, until there is space for the incoming object in the datafile. If there is no space, oracle drops the segments permanently.

SQL> select * from dba_recyclebin;
- to see the dropped object that are in the recycle bin.
SQL> drop table emp purge;
- to drop a table permanently without sending it into recycle bin.

Flashback Technology


Flashback Technology is a new concept introduced in version 10g. In 9i, oracle has introduced a primitive version of flashback concept by introducing a package i.e "dbms_flashback".

Various technologies that are included under flashback technology are :
1.flashback database(for DBA's)
2.flashback table(for DBA's)
3.flashback transaction query(for developers)
4.flashback version query(for developers)
5.flashback data archive/total recall

In order to configure flashback database, we need to configure flash recovery area by setting the following parameters :
1.db_recovery_file_dest
2.db_recovery_file_dest_size
Once we create flash recovery area. the following files will be created in FRA :
1.archivelogs
2.multiplexed controlfiles & redolog files
3.RMAN backup sets
4.flashback logs

In oracle11g, oracle calls Flashback recovery area as fast recovery area. Once we configure flashback database, RVWR(Recovery Writer) gets enabled.

The retension of the flashback logs depends on the parameter
db_flashback_retension_target(default value 24 hours)
We need to set a value based on how long we want to flashback the database.
Archivelogs are meant to roll forward and flashback logs are meant to roll backward. With the help of flashback database we can totally eliminate the concept like point-in-time recovery.
If the number of archives that are generated are more, roll forward takes lot of time.
if the database size is 100gb, allocate atleast 150 to 200gb for FRA. As a DBA, continuously we need to monitor for the availability of space in FRA.

Upgradation & Patching


oracle@venu1> cat /etc/oratab
oracle@venu1> export ORACLE_SID=sales
oracle@venu1> sqlplus / as sysdba
SQL> startup
SQL> select version from v$instance;
SQL> select * from v$version;
SQL> select platform_name,platform_id from v$database;
oracle@venu1 bin> file oracle

Take the backup of ORACLE HOME

oracle@venu1> cd /u01/app/oracle/product/11.2.0.1
oracle@venu1 11.2.0.1> ls
oracle@venu1 11.2.0.1> tar -cvf /opt/bkp.tar db_home/
-local inventory
-global inventory
root@venu1> mkdir -p /u03/app/oracle/product/11.2.0.3/db_home
root@venu1> chown -R oracle:oinstall /u03/app/oracle/product/11.2.0.3/db_home
root@venu1> chmod -R 775 /u03/app/oracle/product/11.2.0.3.db_home
root@venu1> cd /opt
root@venu1 opt> unzip 1of7.zip and 2of7.zip from oracle software.
root@venu1 opt> du -sh database --> to check the directory size.
root@venu1> xhost +
root@venu1> su - oracle
oracle@venu1> vncpasswd
oracle@venu1> vncserver
oracle@venu1> vncviewer
oracle@venu1> /opt/database/runInstaller

Just change the "Software Location" in the oracle software installation process.
Remove "oper" from the drop list.
Ignore all.

oracle@venu1> cp .bash_profile .11203_profile
oracle@venu1> vi .11203_profile
Change the paths as needed.
:wq!
oracle@venu1> . .11203_profile
oracle@venu1> sqlplus -v
oracle@venu1> . .bash_profile
oracle@venu1> sqlplus -v
oracle@venu1> export ORACLE_SID=sales
oracle@venu1> sqlplus / as sysdba
SQL> startup
SQL> show parameter spfile;
SQL> exit;
oracle@venu1> cd $ORACLE_HOME/dbs
oracle@venu1 dbs> ls
oracle@venu1 dbs> cp spfilesales.ora /u03/app/oracle/product/11.2.0.3/db_home/dbs
oracle@venu1> . .11203_profile
oracle@venu1> sqlplus -v
oracle@venu1> export ORACLE_SID=sales
oracle@venu1> sqlplus / as sysdba
SQL> startup upgrade
SQL> @$ORACLE_HOME/rdbms/admin/catupgrade.sql
SQL> select object_name,status from dba_objects where status='INVALID';
SQL> @$ORACLE_HOME/rdbms/admin/utlrp.sql
SQL> select comp_name,status,version from dba_registry;
SQL> shut immediate

Pre Patch considerations and recommandations


1.Take the backup of oracle inventory
Linux : cat /etc/oraInst.loc
Others : cat /etc/opt/oracle/oraInst.loc

use tar to take backup of binaries.
$tar -cvf /home/oracle/Inventory.tar /home/oracle/oraInventory
$tar -xvf /home/oracle/Inventory.tar

cvf : create verbose file
xvf : extract verbose file

2.Take the backup of oracle binaries.
3.Take the backup of oracle database.
Note : If at all if the patch set installation is failed, restore the inventory from the backup and also restore  oracle binaries from the backup.
All patches that are installed using opatch can be rollbacked using opatch.
eg :  789765.zip
$opatch apply 789765
$opatch rollback 789765
$opatch napply <p1> <p2>
Before installing  a patch/patch set, go through the "readme" file.

Upgrading - Action plan


We need to install 10.2.0.5 and upgrade the database to 10.2.0.5.
Going to install 10.2.0.1 in /u02/app/oracle/product/10.2.0.1/db_home.
install 10.2.0.5 on top of /u02/app/oracle/product/10.2.0.5/db_home.
Take downtime from customer(bring down all services from db_home).
Copy pfile/spfile to new oracle_home/dbs
SQL> startup upgrade
SQL> @$ORACLE_HOME/rdbms/catupgrade.sql
SQL> @ORACLE_HOME/rdbms/admin/utlrp.sql

In oracle 11g release 2, oracle has introduced out of place/out of home patching(since 11.2.0.2 and 11.2.0.3 can be considered as the base versions as well as patch sets)to minimise the down time.
To know the list of patches installed in the current home
root> opatch lsinventory
or
root> opatch lsinventory -detail $ORACLE_HOME

Patching & Upgrading


Patch : patch is a bug fix.

Patch set : Collection of bug fixes is called is a patch set.
eg : 10.2.0.2, 11.2.0.2, 11.2.0.3
Different types of patch sets released by oracle are
1.one off patch set / interim patch(small bug fix)
2.patch sets(collection of bug fixes)
3.CPU patches(critical patch updates)
4.PSU's(patch set updates)
5.CRS# bundle patches(to fix the bugs in cluster)

All the above patches can be installed using opatch utility except patch sets.
Patch sets are installed by invoking runInstaller.
The default location of opatch utility is $ORACLE_HOME/opatch.
To know the version of opatch
root> opatch -version

vi .bash_profile
export ORACLE_HOME=/u01/app/oracle/product/11.2.0/db_home
export PATH=$ORACLE_HOME/bin:$ORACLE_HOME/opatch:$PATH/bin

For every quarter(january,april,july,october) oracle releases CPUpatches to overcome security threats(hacking).
PSU contains CPU and small other bug fixes.
After upgrading PSU we need to execute $ORACLE_HOME/rdbms/catbundle.sql and after installing CPU we need to execute $ORACLE_HOME/rdbms/catupgrade.sql

Oracle10gR2
Base version : 10.2.0.1
Patch sets : 10.2.0.2, 10.2.0.3, 10.2.0.4, 10.2.0.5

Oracle11gR2
Base version : 11.2.0.1
Patch sets : 11.2.0.2, 11.2.0.3 --> also considered as base versions.

After installing the patchsets and after upgrading the database some PL/SQL packages, functions and procedures may become invalid. We need to recompile them by executing the following script
SQL>@$ORACLE_HOME/rdbms/admin/utlrp.sql

Catalog mode configuration


No catalog mode configuration


Configuring Primary and Standby databases


Scenario : Recovery when we change backupsets location


Data guard views


v$managed_standby
v$database
v$dataguard_config
v$dataguard_status
v$archived_log
v$archive_gap

Scenario how to recover lost archive log at standby site


Difference between snapshot standby and active data guard


Archive log gap resolution


In order to resolve the archive log gap, oracle has introduced FAL(Fetch Archive Log). For this we need to set the following parameters :
1.fal_client
2.fal_server
In order to reflect the structural changes as it is(creating tablespaces,adding datafiles) we need to set the parameter
"standby_file_management=auto"
Upto 11g, we can configure 9 physical standby's and from 11g we can configure 30 physical standby's.
In 10gR2, oracle has introduced a primitive version of snapshot standby.
In 11g, oracle has introduced a full fledged snapshot standby and we can also convert this to active dataguard but requires separate licencing.

Network transmission modes


1.sync affirm
2.sync noaffirm

In case of maximum protection mode, network transmission mode should be sync affirm.

Data guard configuration modes


1.Maximum protection mode : By configuring data guard in maximum protection mode, we can achieve no data loss solution.
In this mode we need to create standby redologs.
In this mode user gets commit complete acknowledgement, once the data has been written to primary redologs as well as standby redologs(there will be slight performance impact).
Note : If primary is unable to ship the data to atleast one standby, primary goes down automatically.
Recommanded to configure in this mode for financial domains(banking,insurance etc).

2.Maximum performance mode : In this mode , not necessary to create standby redologs.
User gets commit complete acknowledgement once the data has been written to primary redologs.
This mode gives better performance but there are some chances to loose the transactional data.

3.Maximum availability mode : In this mode, initially configuration works in maximum protection mode, if primary is unable to ship the data to standby, primary will not go down and configuration automatically works in maximum performance mode.

Architectural components of data guard


1.Primary database : The database that we wish to protect in the event of any disaster is called primary database.
2.Standby database : The database on which we are depending in the event of primary collapse.
3.Oracle networking : Facilitates movement of data from primary to physical standby.
4.Log transport service : Service at primary which helps in shipping of data from primary to standby(ARCH,LGWR,LNS).
5.Log apply service : Service at physical standby which applies the data at standby(MRP).
6.Dataguard broker : Its an optional componenet generally configured for fast failover and switch over. If we configure dataguard broker with minimal effort, we can switch over.
Note : If we configure dataguard broker, DMON(Dataguard Monitor) get enabled.

Prerequisits to configure physical standby


1.Underlying hardware architecture should be same.
2.Version of Operating System, version of Oracle including pathset level should be same.
3.Primary must and should run in archive log mode.
4.In case of maximum protection mode, we need to create standby redologs at the standby site.

Benefits of dataguard


1.High availability
2.Switch over during planned maintainance.
3.Failover during unplanned downtime.
4.Standby can be used for reporting purpose(offloading the work).
5.We can also take the backups at physical standby.

Standby redo logs


In order to achive a no data loss solution, we need to create standby redologs at the standby site.
Prior to 10g, we can configure 9 physical standby databases.
From 10g, we can configure 30 physical standby databases.

Maximum Available Architecture(MAA)


Various technologies that are included under MAA  are
1.Data Guard
2.RAC
3.Flash Back Recovery
4.ASM

RAC is meant for instance level failures. A multi instance database is nothing but RAC database.
RAC supports :
1.Load balancing
2.Fail over
3.Scalability(adding a node)

Data guard is meant for disk outage/site outage. In the event of any diaster, customer should be in a position to continue his business with the minimal down time. For this oracle has introduced a technology within the database that is called data guard.
Data guard alone or in combination with RAC provides a robost high availability solution.
Even if RAC is in place, in order to have a BCP(Business Continuty Plan) customer has to go for data guard.
There are 2 types of standby databases :
1.Logical standby
2.Physical standby
Logical standby is generally used for reporting purpose and it uses logminer or sqlminer.
If we configure Physical standby with data guard broker then the configuration we call it as data guard.
Data guard broker is an optional component and it is generally used for fast fail over and switch over.

Note : If we want to have BCP, recommanded to configure the physical standby.
Prior to oracle 9i, the configuration mode is called 'delayed protection mode'.
Physical standby is an exact replica of the primary database.
In oracle technology stack, there are 4 different replication technologies.
1.oracle streams
2.oracle data integrator
3.oracle data guard
4.oracle golden gate

Oracle golden gate is a high performance hetrogenous replication tool.
Oracle golden gate reads the data from transaction logs as well as archivelogs and applies the data to a different database.
The site where we configure the physical standby is called 'diaster recovery site'.
In delayed protection mode, archiver takes the responsibility of shipping the generated archive logs to the physical standby.

MRP : Managed Recovery Process
RFS : Remote File Server

In delayed protection mode, there will be lot of data divergance(mismatch) between the primary as well as physical standby.
In delayed protection mode, we cant achieve no data loss solution.
In version 9i, oracle has made lots of architectural changes to the physical standby.
To minimise data mismatch between the primary and the physical standby, oracle has introduced LNS (Logged Network Service).
LNS sucks the data from the redo buffer cache and shifts it to physical standby.
At the physical standby, RFS reads vector by vector and constructs an archive log.
Once the archive log is constructed, MRP applies the data to physical standby.

Note : upto 11g, MRP applies the data to the physical standby, if physical standby is in MRM(Managed
Recovery Mode).
In 11g, MRP applies the data even if the physical standby is in read-only mode. This configuration is called 'active data guard' and requires separate licensing.
Active data guard can be used for real time reporting purpose.
In the above configuration, we cant achieve a no data loss solution.

Note : In order to achieve a no data loss solution, oracle has introduced  'Standby redologs',which needs to be created at the standby side.
The size of standby redologs should be same as the size of primary redologs.
If there is a archive log gap, RFS pings back the archiver(ARCH) to ship the missing archive.

Automatic Storage Management


root> uname
root> uname -r
root> cat /etc/issue
root> uname -a
root> getconf LONG_BIT
root> cat /etc/passwd |grep oracle
root> cat /etc/group |grep oinstall
root> userdel -r oracle
root> groupdel oinstall
root> groupdel dba

Creating Users and Groups
root> groupadd oinstall
root> groupadd dba
root> groupadd oper
root> groupadd asmoper
root> groupadd asmdba
root> groupadd asmadmin
root> useradd -m -g oinstall -G asmadmin,asmdba,asmoper grid
root> useradd -m -g oinstall -G dba,asmdba oracle
root> passwd grid
root> passwd oracle

Creating grid directories
root> mkdir -p /u01/app/grid
root> chown -R grid:oinstall /u01/app/grid
root> chmod -R 775 /u01/app/grid
root> mkdir -p /u01/product/11.2.0/grid_home
root> chown -R grid:oinstall /u01/product/11.2.0/grid_home
root> chmod -R 775 /u01/product/11.2.0/grid_home
root> mkdir -p /u01/app/oraInventory
root> chown -R grid:oinstall /u01/app/oraInventory
root> chmod -R 775 /u01/app/oraInventory

Creating oracle home
root> mkdir -p /u01/app/oracle
root> chown -R oracle:oinstall /u01/app/oracle
root> chmod -R 775 /u01/app/oracle
root> mkdir -p /u01/app/oracle/product/11.2.0/db_home
root> chown -R oracle:oinstall /u01/app/oracle/product/11.2.0/db_home
root> chmod -R 775 /u01/app/oracle/product/11.2.0/db_home
root> cat /etc/sysctl.conf --> to see kernel parameters

Oracle user gets the limits by default and we need to set the limits for grid user.

root> vi /etc/security/limits.conf
grid soft nproc 2047
grid hard nproc 16384
grid soft nofile 1024
grid hard nofile 65536
:wq!

Creating Partitions
root> fdisk -l
root> fdisk /dev/hda
-press m and enter
-press n and enter
-press p and enter

partition number :1

Dont give size for first cylinder give +2g for last cylinder.
-press p --> to see the partitions
-press n and enter
-press e

partition number :2
Dont specify size for first and last cylinder for extended partition.
command : p
command : n
press l and enter

specify +5g for last cylinder of the logical partition
command : p
command : n
press l and enter

specify +5g for last cylinder of the logical partition
command : wq
root> partprobe --> updates the changes to kernel version.
root> dd if=/dev/zero of=/dev/hda5 bs=8192 count=2560
-repeat it for all
root> rpm -qa|grep oracleasm
root> rpm -qa|grep oracleasm|wc -l
root> cd /opt
root opt> ls
root opt> rpm -ivh oracleasmlib.rpm


Configuring Oracle ASM
root> oracleasm configure -i
default user : grid
default group : asmadmin
start oracle asm : y
scan for oracle asm :y
root> df -kh
root> df -ah
root> oracleasm init
root> cd /dev/oracleasm
root oracleasm> ls
root oracleasm> cd disks
root disks> ls
root> fdisk -l
root> oracleasm createdisk VOL1 /dev/hda5
root> oracleasm createdisk VOL2 /dev/hda6
root> oracleasm listdisks
root> oracleasm scandisks
root> cd /dev/oracleasm
root oracleasm> cd disks
root disks> ls
 

Installing GRID software
unzip 1of7, 2of7 and 3of7 zip files to get database and GRID software.
root> xhost +
root> su - grid
grid> vncpasswd
grid> vncserver
grid> vncserver
grid> vncviewer
grid> cd /opt/grid
grid grid> ls
grid grid> ./runInstaller
-skip software updates
-configure GIS for standalone server
-give disk group name
-redundancy = extenal
-select one volume
-use password for all these account
-yes
-oracle base
-software location = /u01/product/11.2.0/grid_home
-yes
-install
-copy paste and run 2 scripts in root user
-run first script
root> cat /etc/inittab
-run second script
root> cat /etc/inittab
-close


Configuring .bash_profile
grid> vi .bash_profile
export ORACLE_HOME=/u01/product/11.2.0/grid_home
export PATH=$ORACLE_HOME/bin:$PATH:$HOME/bin
:wq!
grid> . .bash_profile


Installing Oracle Software in oracle user


grid> ps -ef|grep smon
grid> export ORACLE_SID=+asm
grid> sqlplus / as sysasm
SQL> show parameter instance_type;
SQL> exit
grid> crs_stat -t
-all should be online except ora.ons.type
grid> crsctl check css


Configuring .bash_profile
oracle> vi .bash_profile
export ORACLE_HOME=/u01/app/oracle/product/11.2.0/db_home
export PATH=$ORACLE_HOME/bin:$PATH:$HOME/bin
:wq!
oracle> . .bash_profile

grid> !exp
SQL> select * from v$diag_info;

root> tail -f alert_+ASM.log


Creating Disk Group using ASMCA
grid> which asmca
grid> asmca
-create
-disk group name - ASM_DG_DATA
-external
-select VOL
-ok
-exit
-yes
grid> !exp

Creating Disk group Manually
SQL> create diskgroup ASM_DG_FRA external redundancy disk 'ORCL:VOL3' size 4777m;
SQL> desc V$asm_diskgroup;
SQL> select name,group_number,state from v$asm_diskgroup;
SQL> desc v$asm_disk;
SQL> exit

grid> asmcmd
asmcmd> ls
asmcmd> lsdg
asmcmd> lsct
asmcmd> exit

Create database using DBCA
-create database
-general purpose
-name : sales
-deselect 'configure enterprise manager'
-use same admin password
-storage type : ASM
-use common location for all database files
-browse
-select ASM_DG_DATA
-ok
-select 'Fast Recovery Area'
-browse
-select ASM_DG_FRA
-enable archiving
-finish -ok

oracle> export ORACLE_SID=sales
oracle> sqlplus / as sysdba
SQL> select name,open_mode,log_mode from v$database;
SQL> select instance_name,status from v$instance;
SQL> select name from v$datafile;
SQL> select name from v$controlfile;
SQL> select member from v$logfile;
SQL> select name from v$tablespaces;
SQL> select name from v$tempfile;
SQL> create tablespace raj datafile '+ASM_DG_DATA/sales/raj01.dbf' size 10,;
SQL> select name from v$tablespaces;

Adding a Disk to existing DiskGroup
grid> asmca
-disk group name : ASM_SSSS
-external
-VOL4
-ok

-right click on ASM_SSSS
-add disks
-select disks
-ok
grid> !exp
SQL> alter diskgroup ASM_SSSS add disk 'ORCL:VOL5' size 4777m;

-we can also store text based files using ACFS in diskgroups in oracle11g.
-ACFS = ASM Cluster File System.
root> cd /u01/product/11.2.0/grid_home/bin
root bin> ls
root bin> ls acfs*
root bin> ./acfsload start_s
root bin> cd
root> lsmod|grep oracle
root> su - grid
grid> !exp
SQL>
grid> asmca
-goto 'ASM Cluster File System' tab
-goto 'Volumes' tab
-create
-volume name:asm_volume
-diskgroup name:ASM_SSSS
-specify size: 2gb
-ok

-goto 'ASM Cluster File System' tab
-create
-select 'general purpose file system'
-mount point : /acfs
-ok
root> cd /
root /> ls
root /> mkdir /acfs
root /> ls
root /> cd acfs
root> df -kh
Click on 'show mount all command' in the asmca wizard.
Copy and execute the given path as root user.
root> /sbin/mount.acfs-o all
root> df -kh
root> mkdir -p /acfs/bkp
root> chown -R oracle:oinstall /acfs/bkp
root> chmod -R 775 /acfs/bkp
root> su - oracle
oracle> cd /acfs/bkp
oracle bkp> ls
oracle bkp> vi venu.sql
select name from v$datafile;
:wq!
oracle bkp> ls
oracle bkp> file* -to see the file type text/binary.
oracle> export ORACLE_SID=sales
oracle> sqlplus / as sysdba
SQL> @/acfs/bkp/venu.sql
grid> asmca
-goto 'ASM Cluster File System' tab
-show dismount all command
-copy path and execute in root
root> /bin/umount -t acfs -a
root> df
grid> asmca
asmcmd> ls
asmcmd> lsdg
asmcmd> lsdsk - lists used volumes
asmcmd> lsdsk --candidate -p --lists the free/unused volumes
asmcmd> lsdsk -G asm_ssss --lists disks under diskgroup
asmcmd> lsdg
asmcmd> umount -f asm_ssss
asmcmd> lsdg
asmcmd> mount -f asm_ssss
asmcmd> lsdg
asmcmd> umount -a --dismount all diskgroups
grid> srvctl status database -d sales
grid> srvctl stop database -d sales
grid> srvctl status database -d sales
grid> ps -ef|grep smon
grid> crsctl check has
grid> crsctl stop has
grid> crsctl check has
grid> ps -ef|grep smon
grid> crsctl start has

Virtual Private Catalog


oracle@venu1> export ORACLE_SID=catdb
oracle@venu1> sqlplus / as sysdba
oracle@venu1> startup
SQL> conn rmanuser/rmanuser
rmanuser> select * from rc_database;
oracle@venu1> ssh venu2
oracle@venu2> su - oracle
oracle@venu2> ps -ef|grep smon
oracle@venu2> export ORACLE_SID=hrms
oracle@venu2> sqlplus / as sysdba
SQL> startup
SQL> exit
oracle@venu2> cd /u01/app/oracle/product/11.2.0/db_home/network/admin
oracle@venu2 admin> ls
oracle@venu2 admin> vi listener.ora
-start two listeners.
oracle@venu1 admin> ls
oracle@venu1 admin> vi tnsnames.ora
oracle@venu1> tnsping to_sales
oracle@venu2> cd $ORACLE_HOME/dbs
oracle@venu2 dbs> orapwd file=orapwsales password=rac entries=3 force=y
oracle@venu1> export ORACLE_SID=catdb
oracle@venu1> rman catalog rmanuser/rmanuser target sys/rac@to_sales
oracle@venu2> export ORACLE_SID=sales
oracle@venu2> sqlplus / as sysdba
oracle@venu1> rman catalog rmanuser/rmanuser target sys/rac@to_sales
RMAN> register database;
RMAN> list db_unique_name all;

RMAN> exit
oracle@venu1> export ORACLE_SID=catdb
oracle@venu1> sqlplus / as sysdba
SQL> select name from v$datafile;
SQL> create tablespace vpts
datafile '/u01/app/oracle/catdb/vpts01.dbf' size 4m autoextend on;
SQL> create user vp identified by vp default tablespace vpts;
SQL> grant connect,resource,recovery_catalog_owner to vp;
SQL conn vp/vp
vp> select * from tab;
vp> conn rmanuser/rmanuser
rmanuser> select * from rc_database;
rmanuser> exit
oracle@venu1> rman catalog rmanuser/rmanuser
RMAN> grant catalog for database sales to vp;
RMAN> exit
oracle@venu1> rman catalog vp/vp
RMAN> create virtual catalog;
RMAN> list db_unique_name all;
RMAN> exit
oracle@venu1> rman catalog rmanuser/rmanuser
RMAN> list db_unique_name all;
RMAN> exit
oracle@venu1> rman catalog vp/vp target sys/rac@to_sales
RMAN> exit
oracle@venu1> vi rmanparameters.rcv

run
{
allocate channel c1 device type disk connect 'sys/rac@to_sales';
allocate channel c2 device type disk connect 'sys/rac@to_sales';
backup database plus archivelog;
release channel c1;
release channel c2;
}

:wq!
-We need to release the channel if we allocate, no need when we configure.
oracle@venu1> rman catalog vp/vp target sys/rac@to_sales
RMAN>@rmanparameters.rcv
RMAN> exit
oracle@venu1> ps -ef|grep smon
oracle@venu1> export ORACLE_SID=catdb
oracle@venu1> sqlplus / as sysdba
SQL> alter database enable block change tracking using file '/home/oracle/trace.sql';
SQL> !ps - ef|grep smon
SQL> !ps - ef|grep ora
SQL> exit
oracle@venu1> rman catalog vp/vp target sys/rac@to_sales
RMAN> backup incremental level 0 database;
RMAN> exit


RMAN Catalog : Loss of Full database


RMAN> report schema;
oracle@venu2> cd /u02/app/oracle/venu
oracle@venu2 venu> ls
oracle@venu2 venu> rm -rf*
RMAN> validate database;
RMAN> shutdown abort
RMAN> exit
oracle@venu1> rman catalog rmanuser/rmanuser target sys/rac@to_hrms
RMAN> startup nomount
RMAN> restore controlfile;
RMAN> alter database mount;
RMAN> restore database;
RMAN> recover database;
RMAN> sql 'alter database open resetlogs';
RMAN> report schema;
RMAN> backup section size 2m tablespace USERS;
RMAN> list backup;
RMAN> list backup of datafile 4;
RMAN> list script names;
There are 2 types of scripts :
1.local scripts : Local script is only for specific database.
2.Global scripts : Global script is for all the datbases.
RMAN> create script venubkp
{ backup datafile 4; }
RMAN> list script names;
RMAN> create global script venubkp1
{ backup datafile 4; }
RMAN> list script names;
RMAN> print script venubkp;
RMAN> print script venubkp1;
RMAN> run { execute script venubkp; }

RMAN in Catalog Mode


oracle@venu1> ps -ef|grep smon
-- create catalog database
oracle@venu1> cd /u01/app/oracle/product/11.2.0/db_home/network/admin
oracle@venu1 admin> ls
oracle@venu1 admin> vi tnsnames.ora
TO_HRMS=(DESCRIPTION=(ADDRESS_LIST=(ADDRESS=(PROTOCOL=TCP)(HOST=venu2.oracle.com) (PORT=1521)))
(CONNECT_DATA=(SERVICE_NAME=HRMS)))

oracle@venu2> ps -ef|grep smon
oracle@venu2> cd /u01/app/oracle/product/11.2.0/db_home/network/admin
oracle@venu2 admin> ls
oracle@venu2 admin> vi listener.ora
LISTENER=(DESCRIPTION_LIST=(DESCRIPTION=(ADDRESS=(PROTOCOL=TCP)(HOST=venu2.oracle.com) (PORT=1521))))
ADR_BASE_LISTENER=/u01/app/oracle
SID_BASE_LISTENER=(SID_LIST=(SID_DESC=(SID_NAME=hrms)
(ORACLE_HOME=/u01/app/oracle/product/11.2.0/db_home)))

oracle@venu1> export ORACLE_SID=catdb
oracle@venu1> sqlplus / as sysdba
SQL> select name,open_mode,log_mode from v$database;
SQL> select instance_name,status from v$instance;
SQL> select name from v$datafile;
SQL> create tablespace rman_ts
datafile '/u03/app/oracle/catdb/rman_ts01.dbf' size 10m autoextend on;
SQL> create user rmanuser identified by rmanuser default tablespace rman_ts;
SQL> grant connect,resource,recovery_catalog_owner to rmanuser;
SQL> conn rmanuser/rmanuser
rmanuser> select count(*) from tab;
rmanuser> exit;
oracle@venu1> rman catalog rmanuser/rmanuser
RMAN> create catalog;
RMAN> exit
oracle@venu1> sqlplus / as sysdba
SQL> conn rmanuser/rmanuser
rmanuser> select count(*) from tab;
rmanuser> select * from tab;
rmanuser> select * from rc_database;
rmanuser> exit
oracle@venu2> cd $ORACLE_HOME/dbs
- Configurations to be done at target size.
oracle@venu2 dbs> orapwd file=orapwhrms password=rac entries=3 force=y
- Configurations to be done at catalog side.
oracle@venu1> export ORACLE_SID=catdb
oracle@venu1> rman catalog rmanuser/rmanuser target sys/rac@to_hrms
RMAN> register database;
RMAN> list db_unique_name all;
RMAN> exit
oracle@venu1> sqlplus rmanuser/rmanuser
rmanuser> select * from rc_database;
rmanuser> exit
oracle@venu1> export ORACLE_SID=catdb
oracle@venu1> rman catalog rmanuser/rmanuser target sys/rac@to_hrms
RMAN> show all;
RMAN> spool log to rman.log
RMAN> show all;
RMAN> spool off;
RMAN> exit
oracle@venu1> vi rman.log
configure retention policy to redundancy 2;
configure backup optimization on;
configure controlfile autobackup on;
configure device type disk parallelism 2 backup type to backupset;

configure channel 1 device type disk connect 'sys/rac@to_hrms';
configure channel 2 device type disk connect 'sys/rac@to_hrms';
oracle@venu1> rman catalog rmanuser/rmanuser target sys/rac@to_hrms
RMAN> @rman.log
RMAN> host 'clear';
oracle@venu2> cd $ORACLE_HOME/dbs
oracle@venu2> cd /u01/app/oracle/fast_recovery_area/venu
RMAN> backup database plus archivelog;
oracle@venu2 venu>ls
oracle@venu2> cd $ORACLE_HOME/dbs
oracle@venu2 dbs> ls
oracle@venu2> cd /u01/app/oracle/fast_recovery_area/venu
oracle@venu2> ls


Oracle restart


In oracel 11g, oracle has introduced "oracle restart".
In order to have 'oracle restart' we need to install Grid Infrastructure Services.
Once we install GIS's, "ohasd"(oracle high availability service deamon) gets enabled and it takes care of restarting the resources like listener,instances,services etc.
Once we enable 'oracle restart' we can get rid off the traditional shell scripts that we write to start the listeners,instances,databases etc.

Bringing up the Environment


1.First bring up ASM instance.
2.Then start all the RDBMS instances.

Bringing down the Environment


1.First bring down all RDBMS instances.
2.Bring down ASM instance.

ASM Terminology


1.ASM disks
2.ASM diskgroups
3.ASM instance
4.ASM background processes

ASM disks : The disks which are labeled are used for ASM diskgroup creation are called ASM disks.
ASM disk is nothing but collection of allocation units. The size of allocation unit will be 1mb or 2mb or 4mb or 8mb or 16mb or 32mb or 64mb.
Every ASM file will have one or more allocation units. We can also specify the allocation unit size at the time of ASM diskgroup creation.

ASM diskgroup : This is something like a LUN that we create using third party volume manager.

ASM Instance : This is something like RDBMS instance but it has only diskgroups to mount but not database.
In the server we can have only  one ASM instance(limitation).

ASM background processes : Apart from normal background processes, ASM instance has extra background processes like ASMB, ARBn,RBAL.
In the foreground  ASM instance communicates with RDBMS instance with the help of ASMB background process.
Whenever we add a disk to the existing diskgroup, ARBn dynamically rebalances the data among all the disks in coordination with RBAL(rebalanace maaster).
Number of ARBn processes depends on the parameter "asm_power_limit".

Types of Redundancy


ASM supports 3 types of redundancy.
1.external redundancy
2.normal redundancy
3.high redundancy
External redundancy means no mirroring at oracle ASM level.
Normal redundancy is also called as 2-way mirroring.
In order to create a diskgroup with normal redundancy minimum number of disks/partitions are required are 2.

High redundancy is also called as 3-way mirroring. In order to create a diskgroup with high redundancy, minimum number of disks required are 3.

The purpose of RAID


1.striping
2.mirroring
3.fault tolerance
4.parity

ASM supports RAID0. In this case, ASM stripes data equally among all the disks.

We can implement RAID either at hardware level or at software level. Since hardware level RAID implementation is very expensive most of the customers depends on software level RAID implementation.

ASM(Automatic Storage Management)


As the database size grows into terabytes, space management becomes very complex task, space management becomes a challenge.
To overcome the space management challenges most of the customers used to depend on third party
volume managers like veritas volume manager, Tivoli volume manager etc....

Generally, we dont create a LUN(Logical Unit) using a single disk. We create a LUN by using multiple disks so that data will be striped equally among all the disks.
If the data is striped, I/O contentions will be minimized and the application gives better performance.

ASM = FileSystem/Cluster FileSystem + Volume Manager + RAID(Redundant Array of Inexpensive Disks).

ASM was introduced in 10g version of Oracle. ASM is free of cost either with Standard Edition or Enterprise Edition.
ASM can also act as Cluster filesystem, volume manager and it also supports RAID concepts.
In 10g, ASM binaries are integrated with oracle binaries.

10g & 11gR1 : Oracle Software = ASM + Oracle binaries.
In 11gR2, ASM binaries are separated from database binaries and shipped along with cluster ware binaries, together we call it as Grid Infrastructure Services.
11gR1 : Oracle Software = oracle binaries.
Grid Infrastructure Services = ASM binaries + Cluster ware binaries.
Cluster ware binaries are meant for RAC.

Once we invoke the runInstaller of GIS, we get the following options :
1.Install GIS for standalone
2.Install GIS for Cluster
Oracle has introduced ASM to eliminate third party cluster file systems and volume managers in managing terabyte database environments.
ASM is the foundation for RAC. The prerequisit for RAC is, database should be in shared storage.

ASM supports RAID concepts like RAID0 and RAID1.
RAID0 is nothing but striping and RAID1 is nothing but mirroring.
ASM does not support RAID5.
Related Posts Plugin for WordPress, Blogger...

Flag Counter